Discover how to create and configure tax calculations for incomes and expenses within a hypothetical structured income plan. Correctly setting up these options is essential for accurately forecasting your effective tax rate. This three-part guide will walk you through Adding Income and Expenses, Verifying Your Projections, and Finalizing Your Setup.
Below is a hypothetical example of a client that is working and making a yearly wage of $50,000, will be receiving Social Security yearly amount $24,000, and will be gifting to the grandkids yearly $4,000 for 10 years.
To learn about setting up tax calculations options for income and expesne see articles:
- Tax Calculation Option: Adding Assets into a Structured Income Plan
- Tax Calculation Option: Adding Income and Expenses into a Structured Income Plan
To learn more about Advanced Tax Planning functions see articles:
To learn more about forecasting effective tax rates see articles:
Part One: Adding Income and Expenses
Step 1: Edit: Click on the green edit button underneath the Structured Income Planning heading.
Step 2: Add Income: Click on the green Add Income button underneath the Structured Income Planning heading.
Step 3: Other Income Name: Enter in a title for the column. 
Step 4: First Year Income: Enter in the first-year income: 
Step 5: Inflation Rate: Enter in the yearly inflation rate. 
Step 6: Tax Calculation Option Textbox Dropdown Arrow: Select the dropdown carrot arrow in the tax Calculation Option Textbox and select Wages (line 1 of the tax form).
Step 7: Save: Click on the green Save button underneath the Manage Income Heading.
Step 8: Structured Income Planning Page: You will automatically be taken back to the Structured Income Planning Page.
Step 9: Wages Column: A new wages column will now automatically appear within the plan.
Step 10: BA Income Column: The BA amount will have automatically adjusted, the total income reaches the target amount. 
Step 11: Approx Income Tax: The amounts will have been automatically adjusted to the new income.
Step 12: Add Income: Click on the green Add Income button underneath the Structured Income Planning heading.
Step 13: Other Income Name: Enter in a title for the column. 
Step 14: First Year Income: Enter in the first-year income: $24,000.
Step 15: Inflation Rate: Enter in the yearly inflation rate. 
Step 16: Tax Calculation Option Textbox Dropdown Arrow: Select the dropdown carrot arrow in the tax Calculation Option Textbox and select Social Security (line 6a of the tax form).
Step 17: Save: Click on the green Save button underneath the Manage Income Heading.
Step 18: Structured Income Planning Page: You will automatically be taken back to the Structured Income Planning Page.
Step 19: SS Column: A new column will have automatically be within the plan, the SS column.
Step 20: BA Income Column: The BA amount will have automatically adjusted, the total income reaches the target amount.
Step 21: Approx Income Tax: The amounts will have been automatically adjusted to the new income.
Step 22: Add Income: Click on the green Add Income button underneath the Structured Income Planning heading.
Step 23: Other Income Name: Enter in a title for the column. 
Step 24: First Year Income: Enter in the first-year income. For withdrawals, enter the amount as a negative number. 
Step 25: Tax Calculation Option Textbox: This expense qualifies as a non-taxable items since it is under the limit for a yearly gift and will stay at the default setting; Not Taxable.
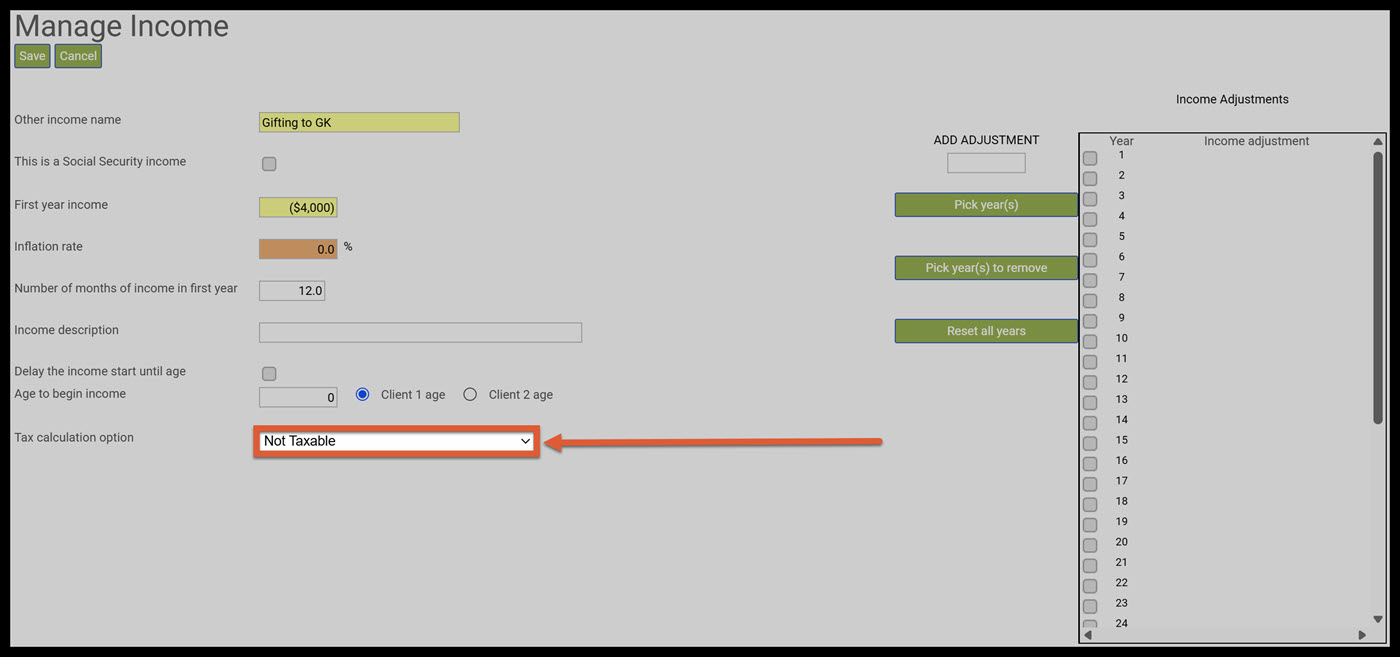
Step 26: Add Adjustment Textbox: Enter in 0.
Step 27: Income Adjustment Table Textboxs: Click on Year 10.
Step 28: Pick Year(s): Click on the green Pick Year(s) button next to the Income Adjustment Table.
Step 29: Income Adjustment Table: The 0 will have automatically moved into year 10. This is an indicator to SIPS that year 10 will be the last year the gifting will happen and it will be reflected in the structured income plan.
Step 30: Save: Click on the green Save button underneath the Manage Income Heading.
Step 31: Structured Income Planning Page: You will automatically be taken back to the Structured Income Planning Page.
Step 32: Gifting to GK: A new column will have automatically be within the plan, the Gifting to GK column.
Step 33: BA Income Column: The BA amount will have automatically adjusted, the total income reaches the target amount.
Step 34:Approx Income Tax: The amounts will have been automatically adjusted to the new income.
Part Two: Verifying Your Projections
Step 1: Manage: Click on the green mange button withing the Approx Inc Tax column.
Step 2: Create Tax Scenario for Year Dropdown Arrow: Click on the dropdown arrow in the text box and select which tax year you would like a scenario to be created for. 
Step 3: Create Tax Scenario for Year: Click on the green Create Tax Scenario button.
Step 4: Cashflow and Tax Advisor: You will automatically be taken to the Cashflow and Tax Advisor page.
Step 5: New Scenario: The new scenario will be located on the right-hand side of the screen.
Step 6: Condense: Click on the green Condense button underneath the Cashflow and Tax Advisor heading.
Step 7: Wages: The first-year income will automatically be displayed in the tax return column.
Step 8: Qualified Dividends: SIPS treats dividend from investment accounts as qualified.
Step 9: All Dividends: These are the dividends from the non-qualified investment account.
Step 10: IRA Distributions Tax Return: This amount is equal to the RMD amounts that was withdrawn in 2025.
Step 11: Client 1 Social Security and Total Social Security Cash Flow: This amount is the clients annual Social Security income calculated before taxes.
Step 12: Client 1 Social Security and Total Social Security Tax Return: Since Social Security benefits are taxable, these fields display the net amount the client will actually receive after taxes are considered.
Step 13: SS Taxable: This is the percentage amount of how much the social security was taxed.
Step 14: Short Term and Long-Term Capital Gains Tax Return: These are the amounts that were withdrawn from the short term and long-term capital gains from the brokerage account.
Step 15: Income Total: These total amounts show the cash flow and tax return amounts of the total income.
Step 16: Taxable Income: This is the total amount of taxable income.
Step 17: Eff Tax Rate: Take note of the effective tax rate, this rate is rounded for display purposes. This will automatically be correlated in the year 1 of the structured income plan. 
Step 18: Approximate Tax Calc: Take note of the Tax Return calculation. The dollar amount should match precisely on the structured income planning page.
Step 19: Save: Click on the green Save button underneath the Cashflow and Tax Advisor subheading.
Step 20: Structured Income Planning: Click on the Structured Income Planning heading underneath the Clients name.
Step 21: Structured Income Planning: You will automatically be taken back to the Structured Income Planning Page.
Step 22: Edit: Click on the green edit button underneath the structured income planning heading.
Step 23: Display Options: Click on the green Display Options button underneath the Structured Income Planning Heading.
Step 24: View Tax Rates: Click on the green View Tax Rates in the Column Display Options Table.
Step 25: Structured Income Planning: You will automatically be taken back to the strucutred income planning page. The Approx Income Tax Column should automatically display the amounts as configured on the Cash Flow and Tax Advisor column.
Part Three: Finalizing Your Setup
Step 1: Display Options: Click on the green Display Options button underneath the Structured Income Planning Heading.
Step 2: Incomes Group 2: Click on the radio button for Gifting for GK in group 2.
Step 3: Group Setup Income: For Group 2 Incomes type in a title of your choosing. 
Step 4: Color Selection: Click on the green Sel button and select what color you would like the group to be in. 
Step 5: Column Display Options: Click on the green Return with Grouping button located in the left-hand side of the table.
Step 6: Structured Income Plan Gifting Group: Assets are automatically grouped under "Assets," Incomes under "Incomes," and Gifting under "Gifting." 
Step 7: Save: Click on the green Save button underneath the Structured Income Planning heading. If you feel you need more support or would like to set up demo time with one of our representatives, please contact us at: support@planscout.com.
